PenFriend Audio Labeler (Version 3)
Temporarily out of stock. Usually ships in Late February.
Product Features
- Revolutionary labelling system for anyone who's blind; no Braille required.
- Select item, peel off back of label and stick it on, Touch tip of PenFriend to label and hold down button to record your message.
- Shaped like a fat pen with speaker at the top, buttons down the side, and sensitive tip at the bottom.
- Four yellow tactile operating buttons contrast against the black casing of the PenFriend.
- Use to label anything, leave audio messages, and as a note-taker.
- Can also be used as a MP3 music player and a talking book player.
- Up to one hour per recorded message; up to 250 hours of recording time.
- Internal memory is 8GB, giving large capacity for many applications.
- Can download MP3 files from computer (including audio books or music).
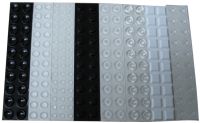
- Complete with 127 labels in a variety of shapes and sizes, built-in speaker, USB cable, neck lanyard, and 2 AAA batteries.
- Can purchase more labels, including Laundry Labels, for unit.
- Pocket-sized, easy to use anywhere.
- Package Weight: about 11.6 ounces.
Product Description
This is a revolutionary labelling system for anyone who cannot see - regardless of whether you know Braille or not! Now labelling everything from your CD collection to frozen foods is literally as easy as 1, 2, 3 ...1. Decide what it is you want to label. It can be a bottle of medicine, a can of soup, a box of cereal, a jar of jam, a DVD, or an important letter you've received in the mail.
2. Peel off one of the self-adhesive, penny-sized labels and stick it anywhere on your item.
3. Touch the tip of the PenFriend to the label you've just stuck onto your item and hold down a button to record your message.
That's it! Now, whenever you touch that particular label with the tip of this amazing little gadget, you'll hear what was recorded pertaining to that unique item. It could be a three-second blurb saying, "Frozen Orange Juice Concentrate". Or it could be a five-minute recording with the name of your favorite CD album, complete with the artist's biography and a list of all the track numbers and names!
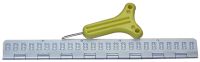
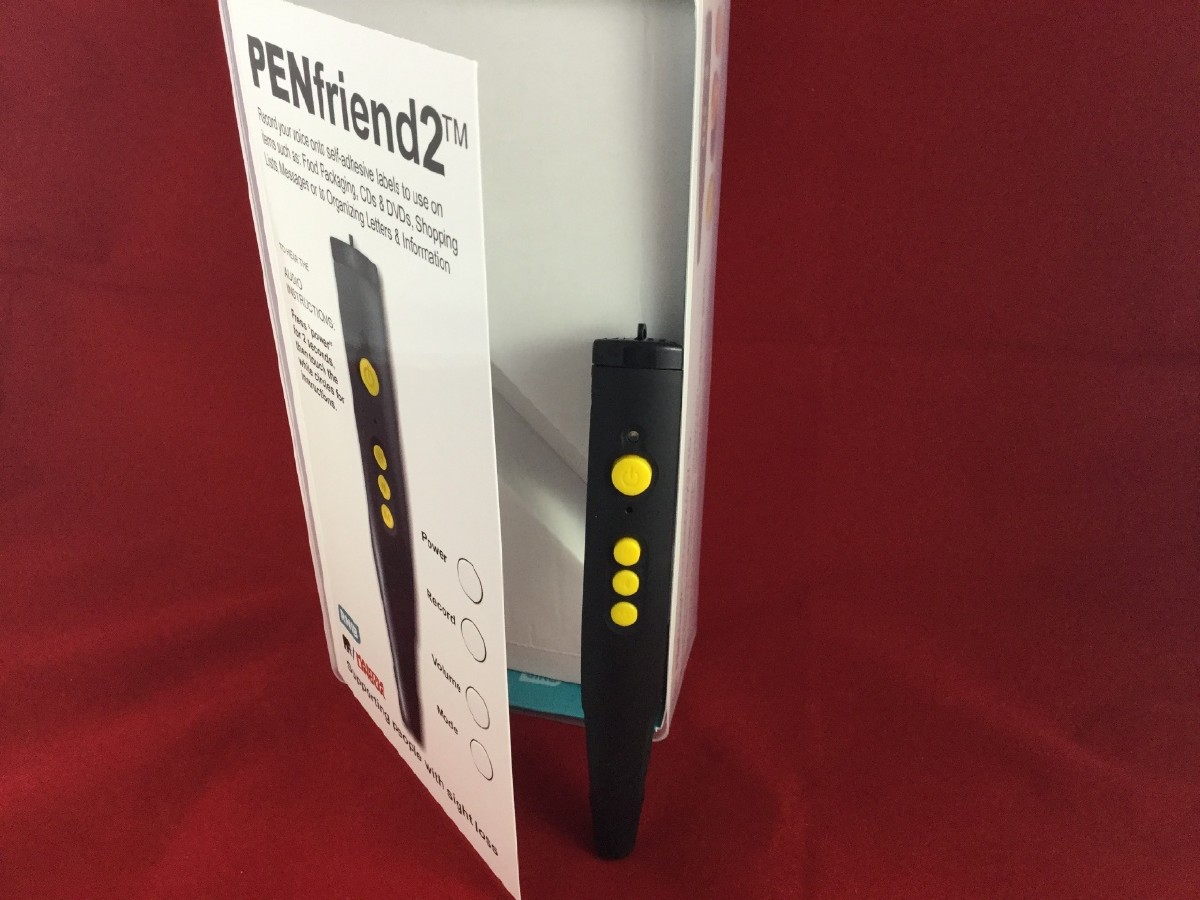
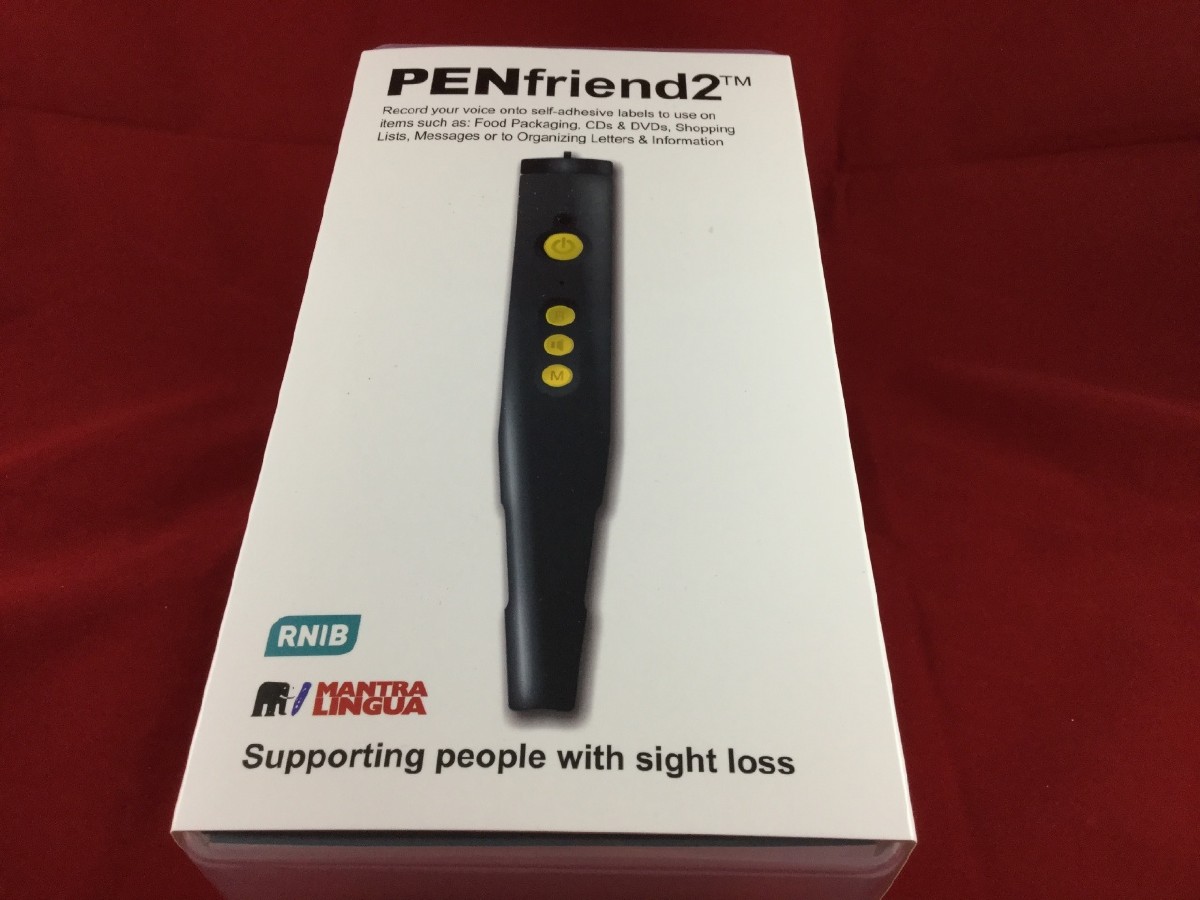
The PenFriend is shaped just like a pen - a little fatter than an ordinary pen, to be sure - but it looks like a pen nonetheless. It's got a loud and clear speaker at the top, and four easy-to-feel, yellow tactile operating buttons down the side, which contrast against the black casing of the PenFriend. At the bottom is a highly-sensitive tip which identifies each uniquely-bar-coded label and records or plays back the recording associated with that specific label.
Using the PenFriend and its self-adhesive labels, you can easily record, re-record, and play back information with this pocket-sized labelling system. And because no computer is required to use this device, you can use it anywhere to label or identify pre-labelled items - whether you're in your own home or visiting relatives across the country.
The PenFriend can be used to label kitchen and food items (including anything in the fridge or freezer), movie and music collections, household cleaners, medicine bottles or boxes, printed documents, or even to record shopping lists or leave audio messages for others. You can also use it as a portable note-taker: just record your message and then place the allocated label in a small notebook or on a card tucked inside your wallet. The unit can even be used as a MP3 music player or even a talking book player!
Each label can accommodate an audio message up to an hour in length. This means you can feel free to record detailed information pertaining to every product you're labelling - whether it's a new prescription drug you've just picked up or a cake-mix package. And because you can order inexpensive packs with several hundred labels in them, and because the pen itself can hold up to 250 hours of recording time, you should never run out of labels to stick on or memory to store your recordings.
Your PenFriend kit comes complete with the ability to download MP3 files from your computer (including audio books or music) if desired. The memory capacity is 8GB, lots of room for all your recording and listening needs.
Instructions on how to get started with your PenFriend are built into the packaging and are announced in an English female voice; simply switch on the device and touch one of the tactile instruction hot-spots on the packaging. The product is supplied with 130 labels in a mix of shapes and sizes, a built-in speaker, a neck lanyard, and the two AAA batteries it operates on.
Product Directions
Directions for the PenFriend Audio Labeler From Future Aids, The Braille Superstore.
1. General description
The PenFriend audio labeller enables you to easily record, and re-record information using this versatile, pocket-sized, easy-to-use product. Simply allocate one of the coded self-adhesive labels and record and store your message on the PenFriend, to instantly playback the recordings hold the PenFriend over the label - no computer required.
1.1 Items supplied with the PenFriend
1 x PenFriend labelling pen
127 x mixed sized labels (small round, large round, large square)
1 x USB cable
1 x neck lanyard
2 x AAA batteries
1 x storage box
1.2 Orientation
Turn the PenFriend so that the pointed end is downwards and the buttons facing you. Keep the device in this position for correct identification of the controls and other features in accordance with the information below.
1.3 Controls and other features
PenFriend's loudspeaker is in the very top protruding section of the device.
On the front of your PenFriend there are four buttons. Starting from the top, thickest end they are: the power on/off button; below that is the toggled volume switch - press the top part to increase the volume and bottom part to decrease; the next button down is the mode button; below this is a small hole with a tactile surround where the microphone is situated; the bottom button, closest to the pointed end of the pen, is the record button.
On the left-hand side towards the top there is a rubberised flap with a slight protrusion at the top, which is used to pull it open. Under this are three sockets - from the top downwards they are the headphone, USB and external microphone sockets.
On the back surface of the PenFriend is the battery compartment (see section "2.2 Battery insertion and removal" below), and a hole which only holds a recessed screw and is not used.
On the back of the pen at the top there is a nodule containing two holes side by side that can be used to attach the supplied lanyard (see section 2.3 for instructions on how to attach the lanyard). The nodule protrudes from the unit slightly, which ensures the unit does not roll when put down on a flat surface.
2. Getting started
2.1 Turning on the pen
To start the pen, press and hold the power button for two to three seconds - this is the button nearest the top of the device. You will hear an audible beep. To switch off, press the same button until you hear a chime. If you do not use the pen for more than three minutes it will automatically switch off to conserve battery power, and this is also indicated by a chime.
2.2 Battery insertion and removal
PenFriend comes with two AAA batteries installed. Replacement batteries are available from RNIB (product code CP05). Please note: RNIB does not guarantee batteries.
Your recordings will not be affected when replacing the batteries.
Removing the battery cover
When you need to change the batteries first locate the battery cover on the rear surface of the unit. Working your way up from the nib of the pen, you will come across three small tactile lines, followed by a semi-circular recess, above this is the battery cover. Insert your thumb into the recess and gently push and lift up to remove the cover.
Inserting new batteries
Remove the spent batteries and insert the new ones, taking care that the terminals are the correct way round. Feel for the spring in the battery compartment, since this will indicate where the negative terminal, or flat end of the battery, should be positioned.
If you insert the batteries the wrong way round, no damage will be done but the pen will not start.
Replacing the battery cover
Replace the battery cover, by inserting the small nodule at the top of the cover into the hole at the top of the battery compartment then push the cover down, you will hear a click when it is in place.
Automatic shut down
To save on battery life, your PenFriend switches off if not in use after three minutes. It will give an audible tone to notify you. If you use headphones (via the uppermost of the three sockets under the flap on the left-hand side of PenFriend), then battery life is maximised, by not using the speaker.
Batteries low warning
PenFriend has an audible battery low alert. This is a different audible tone than you hear when the unit powers down when not in use for three minutes.
2.3 Lanyard
To affix the neck lanyard, which is included in the pack, thread the lanyard through the two small holes at the top rear of the pen. This is the protruding block that also stops the pen from rolling when put on a flat surface. Insert the end of the lanyard in one side and hook out using a ballpoint pen or similar. Sighted assistance may be required, and RNIBs volunteers would be happy to provide support in this and getting you started with labelling items in your home. Contact them by telephone on 0845 604 2341 or email G1volunit@rnib.org.uk
2.4 Volume
The second button from the top is volume up/down. The upper part of the button increases the volume and the lower part decreases it. Click repeatedly until you reach the desired volume. When you switch the pen off the volume settings will return to your setting.
2.5 PenFriend storage box and audio instruction hot spots
The PenFriend is supplied in a re-usable plastic box. We recommend that you keep the box as it will neatly hold any new set of labels, etc, that you may buy in the future.
Audio instruction hot spots
Within the plastic storage box, the PenFriend sits in a moulded plastic insert. There is a flap of cardboard that sit's over the top of this insert, which has audio instructions preloaded onto eight hot spots.
The first four hotspots can be found on the front face of the cardboard flap, which rests over the top of the PenFriend. They run down the right hand edge and are in the form of small raised circles.
Starting at the top, these hotspots are:
Power
Volume
Mode
Record
The remaining four hotspots can be found on the reverse side of the cardboard flap. They run down the left hand edge and are in the form of small circular indents.
Starting at the top, these hotspots are:
Saving files
Download
Batteries
General information
2.6 Demonstration video about PenFriend
If you have access to a computer and the internet you can watch a short demonstration video about PenFriend which is available on YouTube.com, simply type "RNIB Penfriend" into the YouTube search field.
3. Product features
3.1 Mode button
The third button down is the Mode button, which is used to switch the pen between different functions.
Recording mode
When you first power on the pen it is in the recording mode. In this setting you can record, store and play back voice recordings to be used in the PenFriend's labelling function. This is fully explained in section 3.3.
Print setting
After switch on, if you press and hold the Mode button for two seconds, you will hear two beeps to confirm that you have moved to the “print” setting. This setting allows you to listen to pre-recorded information from RNIB which is currently in development (see section 3.6 for further details).
MP3 setting
If you then press and hold the mode button again, you will hear three beeps. Now you are in the MP3 setting. In this mode the PenFriend functions as an MP3 player and you can listen to your own music, which you can transfer to the pen using the USB port and a computer. If there is no MP3 content on the PenFriend it will chime and automatically go back to record mode. Pressing and holding the mode button again will take PenFriend back round to the recording setting, with a single confirmatory beep.
Note: If at any time you are uncertain which mode the PenFriend is currently set to, simply press and hold the mode button, remembering for each press and hold, that one beep indicates the recording/labelling mode, two beeps the print/information mode and three beeps the MP3 mode.
3.2 Record button
The fourth button, which is nearest to the pointed end of your PenFriend, allows you to make voice recordings to be associated with the supplied self-adhesive labels.
Press and hold down the record button, and with the pen in an upright position, touch any recordable label. You will hear a beep, and then you can start recording your voice. Remember to keep holding the record button down while you speak. When you have finished, release the record button and your recording is automatically saved. To play it back at any time, just touch the label you recorded onto with the point of the PenFriend, again with the device in an upright position.
Remember the sequence for recording labels: Press hold, touch, beep, speak, release.
3.3 Recording a label
This is best explained by making a practice recording - either use the practice label situated on the top right-hand side of the cardboard packaging (above the cut out for the lanyard nodule) or any of the supplied labels. Each time you power on the PenFriend it automatically starts in the correct mode for recording or finding labels.
Recording a label
Having powered on, select a label from those supplied. Press the record button and keep it held down, then with the pen in an upright position touch the label with the point, and when you hear a beep, speak a message to be associated with that label. Release the button when you have finished speaking.
Once you have heard the beep you no longer have to keep the PenFriend touching the label, but remember to keep the record button pressed until you have finished speaking.
When making your recording, bring the pen about 30cm or 12 inches from your mouth. The microphone is in the small hole with a tactile surround between the mode and record buttons. You may need to experiment to find the right distance for you.
Remember the sequence for recording labels: Press hold, touch, beep, speak, release.
Listening to a recorded label
Without pressing any of the buttons and with PenFriend in an upright position, touch the label with the point and your message will be played back.
Reusing labels
You can practice the recording procedure either by reusing the same label (all the labels are reusable) or with other supplied labels. If you reuse the label, the previous recording will automatically be deleted from the PenFriend's memory when you make the new recording.
Recording length
There is no limit to the length of individual recordings, so they can be used for short messages as well as long. The internal memory is 4GB which allows up to 250 hours of recording.
3.4 Listening to recorded labels
Each time you power on the PenFriend it automatically starts in the correct mode for finding or recording labels. Having powered on, to hear any label you have recorded, simply touch it with the tip of the PenFriend.
3.5 Backup
If you have access to a computer you can backup your recordings. To do so, connect PenFriend to the computer using the USB cable. Your computer will show that a new drive called PenFriend has been detected. Open the drive and you will find three folders listed: AP4, REC and MP3. To take a backup of your recording, copy the REC folder and paste it onto a new folder, for example c:penfriend. To restore simply reverse this process. Always remember to copy files and not to move them.